
 SHADOW X
Get started in 3 steps.
Open HFM. Open Shadow X. Connect them.AFTER SETUP
More tutorials.
Connection, account settings and trading walkthroughs.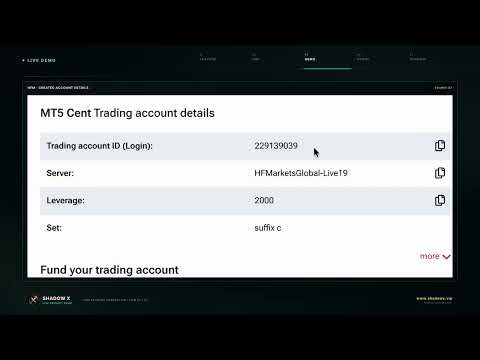
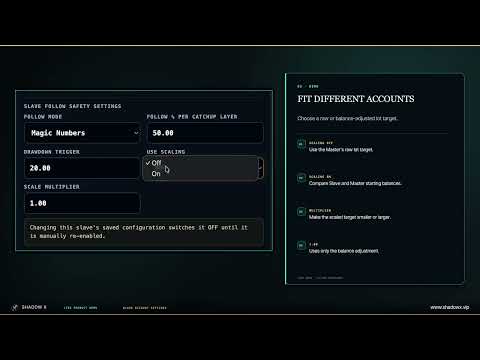
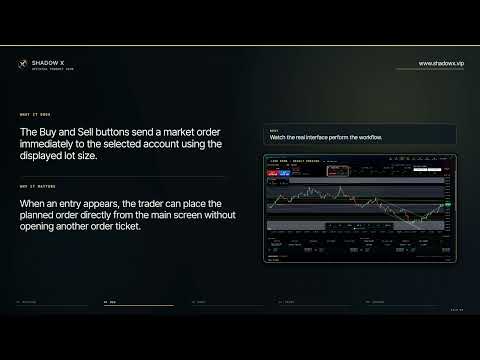
Need more detail? Full instructions & troubleshooting
Get a few things ready
- Use a browser and an email you can open
A computer gives you more room for the first setup; a phone or tablet works too. Keep this guide open and use the action links to open Shadow in another tab.
- Have a card ready for the Basic trial
The eligible Basic trial is USD 0 for seven days, with one Master and one Slave. A card is required at Stripe Checkout after email verification. Read the trial and renewal explanation before deciding.
- Find your HFM MT5 trading details
You will need the numeric trading account ID, the trading Master password and the exact trading server. These come from HFM, not from your Shadow login. If you do not have an account yet, follow the HFM route below.
- Check that the account is supported
Shadow currently connects HFM MT5 accounts for supported gold instruments XAUUSD and XAUUSDC, including supported cent accounts. MT4 and other brokers are not supported. A Master is your main trading account; a Slave is an optional additional account that can follow it.
Do I need my own VPS or to leave my computer on?
Shadow hosts the connected MT5 terminals. You do not need to install the Shadow EA or arrange your own VPS for this hosted setup. An internet connection is needed to use the browser workspace.
Create your Shadow account
- Open the Basic signup page
Use the button below. Check that the selected plan is Basic. If you already have a Shadow account, log in to that account instead of creating another.
- Enter your name and email
Check the email spelling carefully. Use an address you can access now because the next step requires an email verification link.
- Create a password of at least 10 characters
Use a unique Shadow password. The SHOW button lets you check for typing mistakes. This is not your HFM trading password.
- Review the optional referral field and the terms
If you were given a referral code, check or enter it before submitting; otherwise leave it blank. Read the Terms, Billing Policy, Privacy Notice and Risk Disclosure, then tick the agreement box only if you accept them.
- Complete any security check and submit
Complete the browser verification if shown, then press Start Basic Trial. This creates your login; the trial is activated only after the later billing confirmation. Leave the verification page open.
My email is already registered
Use Log in. If you cannot remember your password, use Forgot password to request a reset link. Do not create duplicate accounts to obtain another trial.
Verify your email & read the agreement
- Open your email inbox
Look for the Shadow verification message. If it is missing, check Spam, Junk and other inbox folders.
- Open the newest verification link
Links expire after 24 hours. If it has expired or no message arrived, use Send a Fresh Verification Link on the verification page. A new link replaces the previous one.
- Return to Shadow and log in if asked
Use the email and Shadow password you just created. If verification opened another browser or device, sign in there to continue.
- Read and accept the in-app agreement
Review the risk disclosure and user agreement shown by Shadow. Accept them if you agree, then continue to Billing & Trial. Acceptance does not place a trade.
The verification email still has not arrived
Confirm the address you used, check Spam, and request a fresh link. If Shadow reports it could not send the message or the problem continues, contact support using your signup email. Do not share verification links or passwords.
Activate your free Basic trial
- Keep Basic selected and read the billing summary
Check the plan, seven-day trial and price that will apply afterward. Higher tiers charge at Checkout. One eligible Basic trial is available per customer.
- Read the card and renewal explanation below
The card supports the one-trial-per-customer policy and helps discourage duplicate accounts and repeat-trial abuse. It also sets up the automatic subscription if you continue after the trial. It is not only an anti-abuse requirement.
- Tick the billing-consent box if you agree
The consent explains the required card, seven free days, one Master plus one Slave, and automatic renewal every 30 days unless cancelled. Read it before continuing.
- Continue to Stripe and review the secure checkout
Enter the requested card and billing details on Stripe, check the amount due today and future subscription terms, and complete any bank authentication. Proceed only if the checkout matches the trial you intended.
- Wait for the return to Shadow and confirmation
Keep the checkout flow open until Shadow confirms activation. Creating your login, closing checkout or seeing a return URL alone does not activate access. Trading Account Settings unlocks after confirmed billing.
- Note your trial end date and how to cancel
Open Billing & Trial to see your actual end date. Set your own reminder. To avoid the first charge, open Manage Billing in Stripe, complete cancellation before the trial ends, and check that cancellation is confirmed. A reminder is not scheduled by this guide.
Will my card be charged after seven days?
Yes, unless you cancel before the trial ends. Basic starts automatically and renews every 30 days. Stripe and your Billing & Trial page show the price applicable to you. This is a free trial with automatic billing afterward.
I closed Checkout or my card was declined
Return to Billing & Trial and read the current status before retrying. A cancelled checkout does not activate the trial. If checkout is unavailable or activation stays unconfirmed, contact support; do not create another account or approve a different paid plan by mistake.
What is Start paid plan now?
It ends your remaining free-trial time and authorizes a charge today. Leave it alone if you want to keep the seven-day trial. It is not required to connect your trial accounts.
Prepare your HFM trading account
- Open or locate your HFM MT5 account
New to HFM? Use the new-account guide below, complete HFM registration and any verification it requests, then create a supported MT5 trading account. Already with HFM? Locate your existing MT5 account in myHF. Broker availability and requirements depend on HFM and your region.
- Copy the trading account ID and exact server
Use the trading account information HFM provides. The account ID is numeric, 4–20 digits. Copy the complete server name, including its number or suffix. Do not use your email, myHF profile ID or a similar-looking server.
- Have the trading Master password
The Master password allows trading. An investor password is read-only and cannot be used for this setup. If unsure, recover or reset the trading password through HFM and verify the exact login/server/password in MT5 before connecting it.
- Decide whether to request the optional HFM saving
A verified Shadow X partner relationship can give 30% off the Shadow subscription. New users can follow the partner signup route; existing users can ask HFM to link their myHF profile to Partner ID 30480684. Add the exact account HFM confirms. The saving starts only when Shadow verifies the match in a completed partner report; it is not automatic just because you use HFM.
Does the discount need to be verified before I start?
You can use the Basic trial while the partner relationship is checked. The standard subscription price applies unless the saving is active. Check Billing & Trial before the first charge. A partner link is not a trading-performance benefit; Shadow may earn commission from HFM.
Connect your main account
- Open Trading Account Settings
Shadow normally takes you here after billing activation. If you left the flow, use the button below and log in. Any unfinished verification, agreement or billing step must be completed first.
- Find the Master section for Channel A
Use the Master row, not Add Slave. On first setup, Private Setup Concierge focuses one field at a time; press Next after entering each value. Back lets you review a previous field. Give the account a recognisable name if the form offers one.
- Enter Trading Account ID
Paste only the numeric MT5 trading account ID. Check the digits against HFM. Broker is HFM.
- Enter MASTER Password
Enter the trading Master password, not your Shadow password, myHF password or investor password. Enter credentials only in the authenticated Shadow account form, never in this guide or a support message.
- Choose Trading Server
Select the exact HFM server for that login. If the correct server is missing, ask support instead of choosing a similar server.
- Answer the optional Slave question if shown
After the Master fields, the first-setup concierge may ask whether you want a Slave. Choose No / Continue without one to learn with the Master first, or Yes / Set up my Slave to enter a separate account and review the safety settings in the optional Slave instructions. A Slave is not required to continue.
- Check all details and save
At Review, then save, press Save & Continue in the concierge. The form may say Save Master & Continue, Save Master + Slave & Continue, or Save Account Settings on later visits. Wait for the saved/provisioning status. Hosted provisioning normally takes 2–3 minutes and can take up to 5 minutes; this is an estimate, not a guarantee. Saving details alone is not proof that MT5 connected.
- Answer the Telegram prompt after saving
When Would you like Telegram alerts? appears, choose Not Now, Start Tour to enter the Command Center, or Set Up Telegram to follow the optional Telegram instructions now. After notification setup, press Continue to Command Center. You can add Slaves and Telegram later from Account Settings.
Invalid account, offline, or still provisioning?
Recheck the numeric login, exact server and trading Master password. Confirm those same details work in HFM MT5. If setup stays pending beyond the usual five-minute window, contact support with the status and time. Do not repeatedly change credentials or create another mapping.
Check that Shadow is connected
- Open the Command Center
Read the welcome tour if shown and use Next to move through its screens; Back lets you review, Finish Tour closes the last screen, and Skip tour closes it if you already know the controls. Locate Channel A and confirm that its Master account matches the HFM login you saved.
- Check the Master connection and account information
Wait for the connection status and current account information. Check account identity, balance and any visible last-update or stale/offline notice. A closed market can stop price movement; it does not by itself prove disconnection.
- Open Live Trading and select the correct account
Click the body of the Master account card. Look for · SELECTED and check the channel/account name before interacting with any order or management control. Buttons inside a card can execute actions rather than select it.
- Stop if the status is uncertain
If Shadow shows offline, stale, an unexpected account or a pending command, resolve it before adding exposure. Check MT5 directly and contact support if needed. A command being sent or accepted is not proof that the broker executed it.
I saved the account, but the dashboard is locked
Log in to your existing account and follow the page Shadow opens. Verification, agreement acceptance, confirmed billing and a saved Master are separate requirements. Use Billing & Trial to check access; support can help if a confirmed trial still does not unlock setup.
Add a Slave only if you need one
- Use a separate supported HFM MT5 account
Gather that account’s own numeric login, trading Master password and exact server. Do not repeat the Master account identity in the Slave row.
- Press Add Slave in Trading Account Settings
Add it under the intended Master/channel, within your plan capacity. Enter its trading details and a clear name if available.
- Review every Slave Follow Safety Setting
Review Follow Mode (Magic Numbers, Zone Edges or Grid), Grid Pips when Grid is selected, Follow % Per Catchup Layer, Drawdown Trigger, Use Scaling and Scale Multiplier. These affect when and how exposure is added. Use the detailed guide or ask support if a setting is unclear; example/default values are not a recommendation.
- Save and wait for its connection
Press Save Account Settings and verify the Slave identity and current connection status in Shadow and MT5. New Slaves start OFF. Changing a Slave’s saved configuration also switches it OFF until manually re-enabled.
- Enable following only after your checks
Leave it OFF while learning. If you intentionally want it to follow, review existing Master positions and the Slave settings first, then switch the intended Slave ON and read the confirmation. Following can add exposure; OFF does not close existing positions.
Can I remove a Slave instead?
Make sure the broker account is flat first. Delete Slave retires its hosted terminal; it does not close its broker positions. Turning it OFF also leaves existing positions open.
Set up Telegram notifications
- Open Notifications and the Telegram Setup Guide
Have Telegram installed and signed in. Use the in-app guide below to identify the official Shadow bot. Do not enter broker credentials into Telegram.
- Start the official bot
For the standard personal-alert flow, open the bot, press Start and send a short message such as Hi. For a group, add the bot to the group and send a short message there.
- Copy the Chat ID for standard notifications
Use the linked Chat ID video. Copy the complete personal ID or group ID, including a leading minus sign such as -100. If your account instead shows Connect Telegram, press it and then Start in the linked bot; that account-specific flow links privately without copying a Chat ID.
- Choose notifications and save
For standard setup, switch Telegram Enabled to On, paste the Chat ID, review the notification toggles and press Save Telegram Settings. Multiple destination IDs may be comma-separated. For a connected flow, follow its in-app confirmation and check the available settings.
- Send a test and check Telegram
For standard notifications, open Command Center → Telegram Notifications → Send Test. Confirm the message arrives in the intended chat. If it does not, check On, the exact ID, Start permission and group membership, then ask support.
Can Telegram place trades?
This step is for notifications. Account-specific signal features are separate and are not required for getting started. Receiving an alert does not mean a trade or close was completed; confirm actual account state.
Learn the full trading workflow
- Review the controls before placing anything
Open the illustrated guide and relevant videos. Understand BUY/SELL, lots, stop-loss, take-profit and close scope. A trade basket is the group of managed positions on an account. AP is its lot-weighted average entry price. No trade is required just to finish setting up.
- Check account, channel, lots and your own plan
In Live Trading confirm · SELECTED, current connection information and the symbol. Choose your own direction, size and risk limits. Leave Slaves OFF unless you deliberately want following. Shadow is a workflow tool, not a signal service or a profit guarantee.
- If ready, place one deliberate order and verify it
BUY/SELL controls can send live market orders. Follow the actual control and confirmation shown, then wait for the result and verify the position in Shadow and MT5. If the outcome is unclear, reconcile it before clicking again; do not resend blindly.
- Use a management tool you understand
Review the relevant lesson before setting stop-loss, take-profit, break-even or another tool. Check the target account, scope and confirmation, then verify the resulting position/armed state in MT5. An armed trigger is not a completed exit; protective tools cannot guarantee no loss.
- Close deliberately and verify the broker result
Choose the close control matching your intended scope. Close Basket targets the named Slave basket; Close All covers the Master and assigned Slaves in that channel. Read confirmations and keep Fast Close off while learning. Verify intended positions and related pending orders in MT5 after the result; sent/ACK alone is not closure.
- Review the completed trade in Trade History
Check the recorded result and use Basket Replay when retained data is available. History/replay can have data limits. If the result or remaining positions are uncertain, contact support rather than assuming the account is flat.
Do I have to place a real-money trade to complete this guide?
No. You can finish setup and learn the controls without placing an order. For practice, use a supported demo account. Only you decide whether and when to trade. Ticking this checklist does not verify a real trade or its closure.
Keep these links within reach
- Bookmark this page and your Shadow login
Return to this guide whenever you need a setup step. Checklist progress is saved only in this browser when storage is available. It does not check your Shadow account or sync across devices.
- Recheck your trial end date
In Billing & Trial, confirm the trial end date, renewal price and any verified HFM saving. If you do not want to continue, complete cancellation in Stripe before the end date and verify the confirmation.
- Visit the official tutorials and keep support handy
Use the YouTube links below for account connection and feature lessons. Some videos show an earlier interface; current in-app labels and billing terms take precedence. For help, send your account email, the step you reached, error wording and a screenshot with private details hidden. Never send passwords, card details or verification links.
I need help at a particular step
Use the Get help link in this guide. The email draft includes the step title so support has context. Add what you tried and the error wording, hide private information, then review and send it yourself.